Library Workspaces
Set up the Qvidian library interface to suit your tasks and your working style and then reuse this by saving it as a workspace. You can save your current settings, views, columns, selected folders, filters, search text and more. The next time you open the library you do not have to arrange the library interface again. Instead, you can open the workspace you saved. You can create different workspaces for different tasks. For example, responding to an RFP, managing expired content, or searching for PowerPoint slides. You can switch between workspaces as you perform different tasks.
Note: The library page opens using your personal default workspace. If you do not have a personal default workspace then it opens in your role's default workspace set by your administrator, and if a role default is not available, then it opens in the Qvidian default workspace.
Save a Personal Workspace
You can save your current layout and settings as a Personal Workspace. You can also save and overwrite an existing Workspace and edit existing workspaces.
- Configure the library as desired.
- Click the Workspaces
 icon, located on the right side of the page header.
 - Select Save as Personal Workspace from the menu.
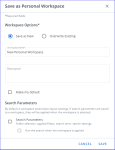
- Choose one of the following Workspace Options:
- Save as New: Enter a Workspace Name and Description.
- Overwrite Existing: Select the Personal Workspace you wish to overwrite from the dropdown list and enter a Description.
- Select the Make my default checkbox if you want to make this your default workspace.
- Select the Search Parameters checkbox to save the search parameters (folder selection, applied filters, search terms, search settings) you have configured in the current workspace.
- Select the Run the search when the workspace is applied checkbox if you want to run a search as soon as you open your workspace. By default, saved search is not executed when you apply a workspace.
- Click Save.
Tip: You might want to consider the following: add/remove fields to be searched, which folders should be included or filters to apply, and any search terms you wish to save to the workspace.

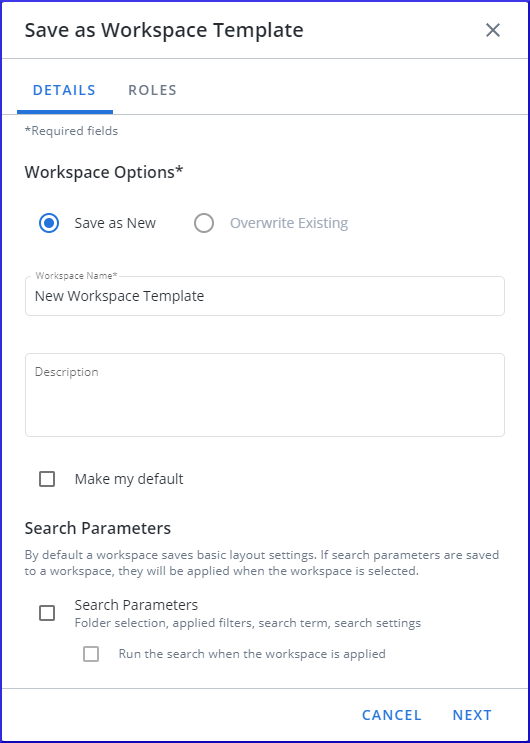
Save a Workspace Template
Your administrator can create a Workspace Template and assign it to different roles. If your role is assigned a workspace, it would be visible in your Workspaces menu.
Note: You can create and assign a workspace template to users with the same role as you if you have the permission Allow user to manage library results default columns for new users. To assign a workspace template to roles other than your role, you will need the permission: Allow user to share to all roles and users.
- Configure the library as desired.
- Click the Workspaces icon located on the right side of the page header.
-
Select Save as Workspace Template from the menu.
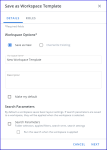
- Choose one of the following Workspace Options:
- Save as New: Enter a Workspace Name and Description.
- Overwrite Existing: Select the Personal Workspace you wish to overwrite from the dropdown list and enter a Description.
- Select the Make my default checkbox if you want to make this your default workspace.
- Select the Search Parameters checkbox to save the search parameters (folder selection, applied filters, search terms, search settings) you have configured in the current workspace.
- Select the Run the search when the workspace is applied checkbox if you want to run a search as soon as you open your workspace. By default, saved search is not executed when you apply a workspace.
- Click Next or select the Roles tab to assign the workspace template to specific roles.
- Assign the workspace template to the desired roles by selecting the Enabled checkbox.
- Select the Default checkbox to set the workspace template as the default workspace for that role.
- Click Save.
Tip: You might want to consider the following: add/remove fields to be searched, which folders should be included or filters to apply, and any search terms you wish to save to the workspace.
Apply a Workspace
When a user opens a Library window, a default workspace will be applied. Any search text passed in via the search will override anything saved in the workspace.
Note: If you do not have a personal default workspace then it opens in your role's default workspace set by your administrator, and if a role default is not available, then it opens in the Qvidian default workspace.
- To switch between personal workspaces and/or templates, click the Workspaces icon, located on the right side of the page header.
- The top 5 recent workspaces will be displayed at the top of the menu. To apply one of these workspaces either:
- Double-click the workspace name.
- Hover over the workspace name, click the More Options
 menu, and select Apply Workspace.
- All other workspaces can be found by selecting See All Workspaces. The "All Workspaces" dialog will appear:
- Select a workspace from the list by hovering over the workspace name, click the More Options menu, and select Apply Workspace.
- Search for a workspace by entering the workspace name into the Find a workspace... search box and click the Search
 icon.
icon.
- Select a workspace from the list by hovering over the workspace name, click the More Options
Edit a Workspace
You can edit the Name, Description, and Default flag for your workspaces. Depending on your permissions, you can also manage the role visibility and defaults for workspace templates. If you want to update the layout and search parameters saved with a workspace or workspace template, you can choose to update an existing workspace while saving.
- Click the Workspaces icon located on the right side of the page header.
- Locate the workspace you want to edit:
- The top 5 recent workspaces will be displayed at the top of the menu. To edit one of these: hover over the workspace name, click the More Options menu, and select Edit.
- All other workspaces can be found by selecting See All Workspaces. The "All Workspaces" dialog will appear:
- Select a workspace from the list by hovering over the workspace name, click the More Options menu, and select Edit.
- Search for a workspace by entering the workspace name into the Find a workspace... search box and click the Search icon.
- Select a workspace from the list by hovering over the workspace name, click the More Options
- The top 5 recent workspaces will be displayed at the top of the menu. To edit one of these: hover over the workspace name, click the More Options
- Depending on your role and selection, either Edit Personal Workspace or Edit Workspace Template dialog will appear.
- Edit the Workspace Name and/or Description.
- Select the Make my default checkbox if you want to make this your default workspace.
- If you have the required permissions to edit and create workspace templates, select the Roles tab to update the role visibility and defaults.
- Assign the workspace template to the desired roles by selecting the Enabled checkbox.
- Select the Default checkbox to set the workspace template as the default workspace for that role.
- Click Save.
Note: You can create and assign a workspace template to users with the same role as you if you have the permission Allow user to manage library results default columns for new users. To assign a a workspace template to roles other than your role, you will need the permission: Allow user to share to all roles and users.
Delete Workspace
You can delete workspaces that you own or have permission to manage.
- Click the Workspaces icon located on the right side of the page header.
- Locate the workspace you want to delete:
- The top 5 recent workspaces will be displayed at the top of the menu. To edit one of these: hover over the workspace name, click the More Options menu, and select Delete.
- All other workspaces can be found by selecting See All Workspaces. The "All Workspaces" dialog will appear:
- Select a workspace from the list by hovering over the workspace name, click the More Options menu, and select Delete.
- Search for a workspace by entering the workspace name into the Find a workspace... search box and click the Search icon.
- Select a workspace from the list by hovering over the workspace name, click the More Options
- The top 5 recent workspaces will be displayed at the top of the menu. To edit one of these: hover over the workspace name, click the More Options
- Click Yes, Delete.
Note: You can manage a workspace template to users with the same role as you if you have the permission Allow user to manage library results default columns for new users. To manage a workspace template with roles other than your role, you will need the permission: Allow user to share to all roles and users.
Make a Workspace Default / Reset to My Default
Your default workspace will be indicated in the list, so that you can easily switch back to the preferred default workspace.
To return to your default workspace:
- Click the Workspaces icon located on the right side of the page header.
- Select Reset to My Default.
To set a workspace as your default:
- Click the Workspaces icon located on the right side of the page header.
- Locate the workspace you want to make your default:
- The top 5 recent workspaces will be displayed at the top of the menu. Hover over the workspace name, click the More Options menu, and select Make My Default.
- All other workspaces can be found by selecting See All Workspaces. The "All Workspaces" dialog will appear:
- Select a workspace from the list by hovering over the workspace name, click the More Options menu, and select Make My Default.
- Search for a workspace by entering the workspace name into the Find a workspace... search box and click the Search icon.
- Select a workspace from the list by hovering over the workspace name, click the More Options
- The top 5 recent workspaces will be displayed at the top of the menu. Hover over the workspace name, click the More Options